Category Archives: Uncategorized

Easter Dragons

My daughter-in-law Kris showed me a recipe she had for Easter Dragon Breads and suggested we try it for Easter. The dragon is about the size of a medium baguette and has a red-dyed egg in it’s mouth.

We tried dying brown eggs with a pureed beet. Brown is not the best color to start with for this and the dye didn’t really get absorbed into the eggshell. The bread recipe was kind of boring and the thin parts (the feet) tasted like crackers. I didn’t take any photos so you’ll have to trust me that the result was disappointing.

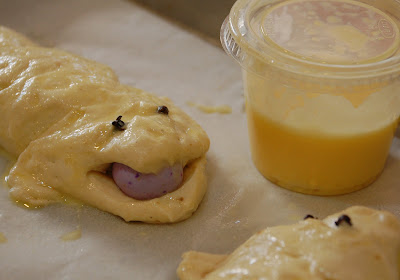
I decided to use my reliable cinnamon roll dough for the bread and use cloves instead of small balls of dough for the eyes. I also wanted to make smaller dragons so I used malted milk Easter egg candies instead of the full-sized red egg.

Note that the legs are folded out from slits cut into the sides of the body and then pressed with a fork. These looked pretty hopeful at the rising stage. I liked the multiple color choices for the eggs.

When fully risen, I brushed each one with egg wash so the dragon’s skin would develop a nicely browned color as it baked.

At this point they were beginning to look a little more like fish than dragons but I was still hopeful.

Surprise!

Disgusting! Okay, this is not the effect I had been expecting. I should have realized that when a malted milk egg reaches 350 degrees, it will melt. What was I thinking?

And the final shape looked more like a flounder than a dragon. But the flavor and texture were perfect. I’d rolled cinnamon into the center before I shaped the dragon, so we enjoyed eating them anyhow.

Next stop was the Japanese market in Goleta to buy some quail eggs. This time I used vinegar with the beet juice when I dyed the eggs. It worked better but the dye tends to bleed a bit. I also decided to skip the slit and fold technique for the legs and go with separate pieces of dough.


Voila! This one looks pretty good. Not intimidating, but far more like a dragon would be expected to look. The quail eggs are perfect but next time I’ll use standard Easter egg dye.

Make This Pie!

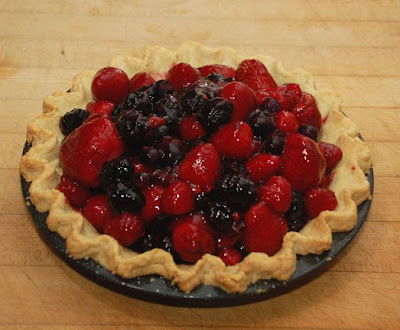
Krista’s recipe for this Triple Berry Pie is in the latest issue of Edible Santa Barbara.
I made two of them for Easter Dinner yesterday. I used strawberries from Shawn and Melissa of Out of Step Farms and blueberries, blackberries, and raspberries from Chuy at the Sunday farmers market.

This pie actually has four types of berries, but triple is a lot easier to say. It also has a coating of white chocolate and cream cheese spread onto the inside of the pre-baked crust. The berries are coated, not cooked in the glaze, which is made from some of the blueberries and a little cornstarch.

It looks spectacular and tastes fantastic. I had to test the recipe for the magazine. I “tested” it four or five times before the issue came out.

You can read my step-by-step description of how to make this pie (with photos) on the Edible Santa Barbara blog.

Broccoli Flowers and Cupcakes

Broccoli Flower Salad

I didn’t cut my broccoli florets from the plant quickly enough so some of them have begun to flower. I feel better about this when I see how many bees are enjoying these flowers when the sun is out. However I decided to experiment with a stalk to find out how much of it was still edible. Some of parts of the stems are tender but there are also some stickery parts up near the flowers. My first salad involved some chewing and spitting out.

For the next salad, we used just the flowers.

This salad was very successful. My husband Dave made it using volunteer lettuce. Last fall I let my lettuce go to seed for the bees. When I finally pulled it up, my compost bin was too full so I left it on the ground near the bin for a few weeks. A few months ago I noticed that I had a patch of lettuce on the ground near the compost bin.

The sugar peas are also from my garden, but they were planted there on purpose.

Cupcakes

I agreed to do a tea as an auction item for Guide Dogs for the Blind. The woman who got it is a 3rd grade teacher at Howard School, so she is bringing her class to Braille Institute to have tea. My friend Adelaida is joining us with her guide dog, Caraway, to introduce Caraway to the children. I’m working on some fanciful items to serve.

I want to do some mini cupcakes. I decided to try Cat Cora’s batter for Alma’s Italian Cream Cake. I love this cake. It has a great texture and keeps a long time in the refrigerator. I left out the nuts and the coconut because I want a basic simple reliable cupcake recipe–one that domes nicely but doesn’t cross over into muffin territory. The texture needs to be light and delicate, like this cake. I can add in coconut, chocolate, or nuts once I have the basic recipe figured out.

My first attempt didn’t come out the way I’d envisioned it.

They looked fine coming out of the oven but they sank in the middle as they cooled. (They tasted great, but I want the appearance to be appealing too.)

Cat Cora uses a great technique for getting rise. Buttermilk and baking soda give the batter some initial rise, but then she also separates out her egg whites and beats them to fold into the batter. The innovative thing is that she saves out a little of the sugar to beat into the whites after they begin to foam. That makes the egg white more meringue-like and more stable.

So I wasn’t having a problem getting rise, but as they cooled, the cake structure wasn’t strong enough to maintain height. If you look on the Internet, some experts say this is caused by beating too much and some say it’s from not beating enough. I’d opt for the not beating enough since the gluten strength comes from beating (beating too much will make cakes tough, but probably won’t make them fall).

I decided to decrease the sugar in the recipe, since sugar weakens the gluten strands that provide structure.

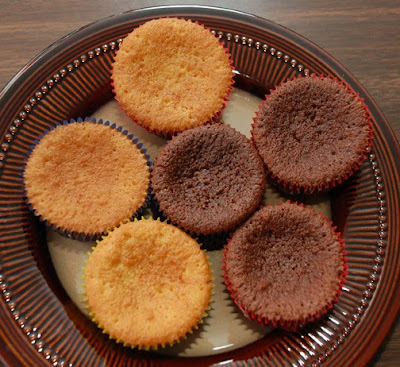
The texture of these is delicate and they are sweet enough without the extra sugar, but the lovely domes they had coming out of the oven disappeared as they cooled. At least these didn’t sink, but they look a bit shriveled. (Any of these cupcakes would be fine with a bit of frosting, but I want the unglazed cupcake to look perfect.)

So I decided to decrease the buttermilk just a bit so see if that would help. Here is the result.

This makes me happy. Next I’ll try a chocolate version, figure out how much to put into a mini muffin pan, and decide how I want to decorate them.

Sunday Breakfast

Someone in our house really likes pancakes.

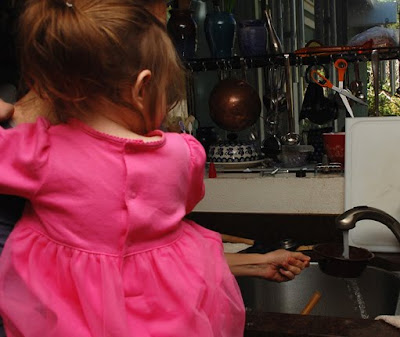
And a princess builds up a hearty appetite after a busy morning scrubbing floors.

So Mama Kris gathered the ingredients and carefully measured them out to make a pancake batter.

She whisked out most of the lumps.

Then she remembered we had leftover blueberries in the refrigerator. Saraphina helped her rinse the berries in a strainer.

Then she stirred them into the batter and we made pancakes.


While they were cooking, Saraphina declared that she was going to eat her breakfast in a drawer.


It turns out that most food tastes better when eaten in a drawer.


Amber, Saraphina’s loyal attendant, agrees.


Afterwards, Saraphina checked out the garden from her own private viewing place.

Weekend Food Highlights

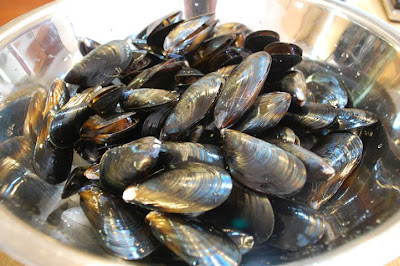
Costco had fresh mussels again this weekend. There’s a recipe in Emeril’s 20-40-60 Fresh Food Fast cookbook I wanted to try. It said it would take 18 minutes to prepare and cook the mussels.

The ingredients are simple: cleaned mussels, shallots and garlic minced, minced parsley, cream with white wine, salt and pepper. However by the time I finished picking, washing, and mincing the parsley, mincing garlic and shallots, and cleaning the mussels, it was well-past 18 minutes. Scrubbing the mussels and pulling off the strands of hairy mussel beard took the longest. Maybe with a kitchen staff it goes a bit more quickly. Anyhow, once the ingredients were cleaned and prepped, it went very quickly.

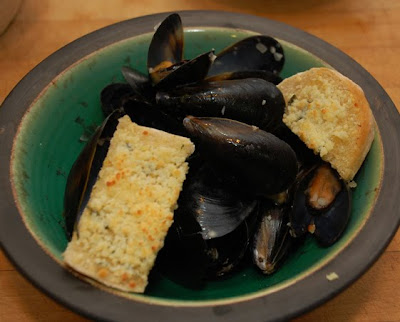
First you saute the minced items, then add the wine, cream, and seasonings and bring it all to a boil. Pile in the mussels and put on the lid and simmer for 5 to 6 minutes. I used Shaun’s Le Creuset wok. It’s the perfect size for 5 lb. of mussels. Only 2 of the mussels didn’t open. We ate the opened mussels with garlic cheese bread using bread Dave had baked that morning.

Meatball Stroganoff Adventure

My daughter-in-law Kris and I have been discussing ways to expand Saraphina’s meal choices beyond macaroni and cheese. Saraphina thought something with organic coconut might be good.


But since she liked the lamb meatballs we made a couple of weeks ago, we decided to try another meatball recipe. We chose a meatball stroganoff from the most recent issue of Cuisine at Home. We had gotten some really delicious grass fed beef from John DeBruin at a recent Sunday farmer’s market. So while that was defrosting we chopped an onion and garlic to saute and then added fresh minced parsley, bread crumbs, spices, and beaten eggs.


While the meatballs baked for 20 minutes, we brought some water to a boil for the egg noodles and started on our stroganoff. Saraphina checked the cupboard for a pan.

After she decided to plug in the mixer, Kris found her a less dangerous task to work on… whisking water in a copper bowl. (Note the bag of coconut is still handy just in case we change our minds.) The whisking took a lot of concentration so we had time to work on our mushroom slicing and measure the other ingredients.

Shaun showed Kris how to slice mushrooms by sliding the knife forward rather than pressing down.

Saraphina soon finished whisking the water.


Fortunately, the meatballs were ready for tasting and Saraphina wanted that job. She ate two!


Miranda and Joey showed up just as we were getting ready to prepare the sauce. They helped entertain Saraphina while we finished up the stroganoff and noodles. They stayed for dinner.

The sauce was a little problematic… lumpy. In the recipe, you cook the onions, then deglaze the pan with white wine. You cook the wine until it evaporates, then sprinkle in flour. This is sort of like a roux, but we didn’t have enough oil in the pan to keep the flour from crusting to the pan. When we added the broth, we ended up with clumps of undissolved flour floating in the broth. We used an immersion blender to break up the lumps and make a smooth sauce. We added sour cream and put the sauce onto the meatballs and noodles.

The meatballs were great but we all decided that the stroganoff had too much mustard. Shaun saved the day by adding some Himalayan red sea salt, grated lemon rind, and minced jalapeno. Now that was good! It went from leftovers destined for the dog bowls, to something we’ll heat up again for lunch tomorrow.

Sorry I forgot to take a photo of the finished dish. I’ll add one later if someone else doesn’t get to the leftovers before I do.

Cooking with Family and Friends

My New Year’s resolution–what it’s the middle of February already?–is to use this blog to share kitchen adventures. Have I ever mentioned how much I love to cook? In my family cooking is usually a group event.

I realize that not everyone grew up in a family where aunts and uncles and grandparents were all in the kitchen together, with grandchildren at their knees begging to lick the beaters and spatulas or outside searching for sticks to roast marshmallows over the BBQ.

I have to admit that in the 1950s, the men did the outdoor cooking and the women did the indoor cooking. As grandchildren, we scurried back and forth between the two stations (after we finished polishing all the silverware and setting the table). The men also cleaned the fish. They probably would have caught all the fish too but my grandma was a really good fisherwoman, so grandpa never discouraged the women from casting a line into the lake.

To share my experience and love for cooking, I gave my daughter-in-law a couple of cookbooks for her birthday. She chooses recipes she’d like to learn and we make them together. I plan to share those stories here over the next year in the hope that it will inspire more folks to cook with their families and friends.

I also love to cook with kids. It just so happens that my son’s friend has a 7 (soon to be 8) year old daughter who comes over often to cook with me. Today was a holiday so she called me last night to ask if I would teach her how to make cinnamon rolls.

They arrived just as I finished making the dough. Dave also make a batch of whole wheat bread and set aside some of his dough for us to try as well.

So while we were waiting for the dough to rise, I told her about my new mold for making chocolate spoons so we could eat our ice cream with the spoons and then eat the spoons. She helped me temper some chocolate and pipe it into the spoon molds so we could try it out.


We thought the spoon would be especially good with peppermint stick ice cream and she suggested we add a “hint of mint” from the garden. We soon discovered that the spoon breaks quickly if the ice cream is too cold and chocolate tastes better when it melts quickly in your mouth. So we think the spoon would taste better with something less cold, like creme brulee.

Since we had more tempered chocolate than we needed, I showed her another new mold I’d gotten. I’ve been interviewing beekeepers lately and using some of their honey to make filled chocolates. I thought this mold looked like a beehive so I bought it.

My junior chef laser-tested the temperature of the chocolate as I warmed it back to pouring temperature. We made the shells, filled them, and then sealed them. They came out of the mold easily. I brushed a little edible gold dust onto the tops and here’s how they look.


Those are reflections at the bottom, not leaking honey but I do see a droplet at the top that looks a tad suspicious. Guess we’ll have to eat them quickly.

While we were working in chocolate, her dad was fixing us a delicious lunch with lots of fresh vegetables, tofu, and Chinese noodles. It’s a good thing, because we still had cinnamon rolls to taste.

We decided to make sticky buns so we mixed up the topping, sprayed some pans with oil, and spread the topping on the bottom of the pans with lots of chopped pecans. I showed her how to roll the cold dough into a rectangle, then we covered it with a mixture of cinnamon, butter, and flour. We used a Silpat mat to make a sushi-like log and did a little work with fractions to get 8 rolls out of each log. We ate lunch during the final rise, then popped 32 sticky buns into the oven.

About 30 minutes later we turned them out onto a rack to cool. We all agreed that we were really full from lunch and ice cream with chocolate spoons, so maybe we’d wait for the buns to cool before we tried them.

Okay, we didn’t wait very long. Here’s a photo. I use agave nectar in my dough and in place of corn syrup in the topping, so it’s not quite as intensely sweet as it looks, she said, knowing no one would really believe her.

Soup #3 – Roasted Butternut Soup

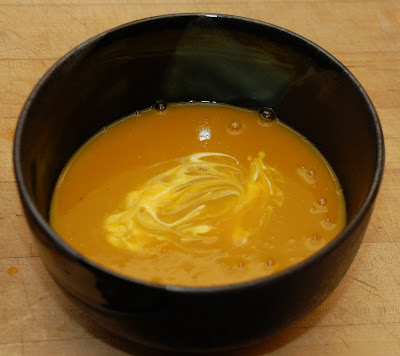
Krista provided this recipe for Sunday Slow Soupers. We tried it last night with a homemade Chicago style pizza. This is a nice easy recipe if you use a butternut squash as suggested in the title and ingredients. However since I had a really big bag of Hubbard squash in the freezer, I used that.

Let me tell you a little bit about hubbard squash. First of all, it looks like it fell from outer space and possibly houses alien creatures. Second, only someone who was told by someone they trusted would believe that there was a lovely sweet tender flesh inside. Third, this is the world’s most difficult squash to open. It’s similar to opening a dried coconut (which is easier if you use a machete). You can see what I’m talking about at http://starlightbakery.blogspot.com/2008/10/padaro-pumpkins.html where you can read the step-by-step process my sister and I used to get to the tender flesh.

This one yielded enough puree for about 24 pumpkin pies. So far I’ve made 4, so I welcomed an opportunity to use some of it in this soup.

I used fresh instead of dried ginger in the recipe but we decided that I should have used more. After blending, I used a sieve to remove the pulp. But then I put it back into the left-over soup because it tasted really good and I don’t want to waste it.

I also have a large bag full of fresh thyme on my counter, so in went a few sprigs of thyme for flavor. The garnish is Greek yogurt.

Fortunately there is still a little left, hidden in the back corner of the refrigerator behind all the furry leftovers (where no one else will see it). Now if I can just get to it while everyone else is showering or taking naps, then I won’t have to share.

Soup #2 – Mexican Turkey Soup

We tried Jerry’s Mexican Turkey Soup recipe tonight. Yet again avoiding the grocery store, I noted on my way to feed my compost worms their Thanksgiving Dinner that there were still some small roma tomatoes on one of our plants. I also had a can of corn niblets in the pantry, some frozen chipotle, and a few bedraggled green onions which I supplemented with some shallots. Fortunately my neighbor’s lime tree borders our driveway and there was one lying on the ground under the tree. Lucky me.

While the recipe calls for dry roasting both the corn and the tomatoes in a skillet on high heat, I chose to char my tomatoes with a torch… the kind you get at Sears. We discovered this roasting method when our kitchen was being remodeled (after trying a wood-fireplace roast and ending up with soot-covered tomatoes). It works especially well for peppers and chiles. Stick them on a fork and run them through the flame. I did char the corn, however, in the skillet over high heat because the fork thing doesn’t work on canned corn.

I put a leftover turkey wing bone in my chicken stock and let it simmer while I chopped the onions, garlic, and charred tomatoes.

The only difficult part was getting the avocado cream to sit photographically in the soup at the end.

No one seemed to care, they just wanted to try it. It was delicious.

Sunday Slow Soupers: Porcini and Chestnut Soup


Krista Harris who writes In and Out of the Garden, told me about the Sunday Slow Soupers. Every Sunday each member makes the same soup and then writes about it. Porcini and Chestnut Soup was their first soup, scheduled for last Sunday. What? Today is Friday? Aargh, I’m a little behind but I did find raw chestnuts!

Here’s the recipe, courtesy of Amy. I made a few modifications based on not wanting to go back to the grocery store on the heaviest shopping day of the year and risk my life for a parking spot. Instead of celery, I used a few hearts of romaine. I used cilantro instead of parsley (in California we use this like parsley anyhow). We had some leftover kabocha squash from Thanksgiving (Californian for pumpkin), which I added with the carrots. I chose the sherry option at the end.

So I bought the chestnuts (early before the crowds hit the shopping center) then wished I bought a can of chestnuts when I started reading about how to roast and peel them.

I like it better when you stop on a street corner in London to buy them hot off the grill and keep them in your pockets to warm your hands. But London was too far to go for roasted chestnuts today. So I heated the oven to 400 degrees, cut a slit in the rounded side as directed by a nearby cookbook, and put them into a jelly roll pan with a bit of water.

I think I left them in the oven about 20 minutes–I was upstairs when the timer went off at 10 minutes. I was really dreading the part that says peel hot shell off nuts and then try to rub off the skin… if this doesn’t work, boil them and try again. Instead, I cut the hot leathery nuts in half and used a small melon baller to scoop out the mealy centers. The skin miraculously stuck to the inside of the shell, not the nut. Yay!!

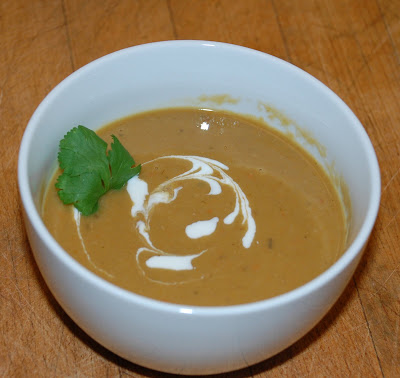
The rest of the recipe was simple and some friends arrived just in time to join us for the soup tasting. None of us had ever had chestnut soup before and we all enjoyed it. The porcini mushrooms gave it a deep rich flavor and the chestnuts gave it a hearty texture. I didn’t add any extra liquid and my broth was salty enough so we didn’t need to add salt. The color was quite pleasing. The fake creme fraiche was made by whisking together some warmed cream cheese and milk. A nice photographic substitute.

I’ll definitely do this one again.